Contractors finish the work, walk out, and the space looks done. It isn't. Renovation work — framing, drywall, painting, flooring — deposits a layer of particulate matter throughout the entire structure, including rooms that were sealed off during the work. Household vacuums recirculate this material. Regular mops spread it. Moving back in and starting normal cleaning routines without a proper post-construction cleanup means living in suspended construction dust for weeks while your HVAC system distributes it through every duct in the home.
We handle post-construction cleaning for Atlanta homeowners and general contractors. Here's what the process actually involves and why the equipment requirements are non-negotiable.
What construction dust actually is
Drywall compound (joint compound) is the dominant source of post-construction dust. It's roughly 50% calcium sulfate (gypsum), with additives including crystalline silica, mica, and limestone. The problem isn't the composition — it's the particle size. Sanding drywall joint compound produces particles in the 1 – 10 micron range. For comparison, human hair is roughly 70 microns in diameter. Particles below 10 microns are inhalable. Particles below 4 microns reach the lower respiratory tract.
Silica is an occupational health concern at construction sites — OSHA has a permissible exposure limit for respirable crystalline silica (50 µg/m³ as an 8-hour TWA). In a recently renovated home with inadequate cleanup, ambient silica levels in the first week post-renovation can exceed that threshold. This is why the CDC and NIOSH classify post-construction dust as a health hazard, not a cosmetic nuisance.
Drywall dust is also alkaline (pH 8 – 9). Contact with eyes or mucous membranes causes irritation. In homes with central air, unsettled drywall dust that gets pulled into the return air intake coats the evaporator coil, reduces airflow efficiency, and creates a biofilm substrate for microbial growth over time.
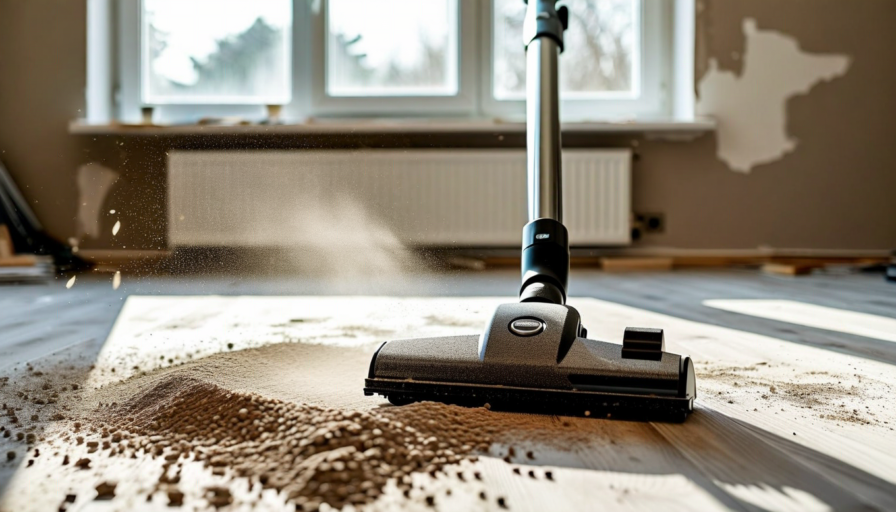
Why standard equipment doesn't work
A standard household vacuum — even a high-end consumer model — is not adequate for post-construction cleanup. The reason is filtration. Most home vacuums use HEPA-rated filters in the sense that they meet the standard at time of sale, but the filter bypass around the edges of a home vacuum filter is significant at fine particle sizes. More critically, the exhaust air from a consumer vacuum carrying drywall dust creates a plume of fine particles that settle out over 20 – 30 minutes. You're cleaning the floor and depositing dust on every other surface in the process.
Industrial post-construction vacuums use what's called a "true HEPA" or "H-14 HEPA" filter rated at 99.995% efficiency at 0.3 microns, with a sealed system that prevents filter bypass. The vacuum exhaust through these filters is cleaner than ambient air. This isn't a specification detail — it's the difference between cleaning up construction dust and redistributing it.
We bring two of these units on every post-construction job: one for general floor and surface vacuuming, and one reserved for HVAC vent covers, which are the highest-accumulation point in the structure after sanding work.
The correct sequence for post-construction cleaning
Sequence matters in post-construction cleanup because disturbing any settled surface reintroduces particles into the air column. The wrong order means re-contaminating cleaned surfaces. The correct sequence:
Phase 1: HVAC and vents first. Before any floor work, remove all HVAC vent covers and vacuum the first 18 – 24 inches of every duct. Change or replace the air handler filter. This prevents the system from recirculating dust after Phase 2 disturbs floor deposits and puts particles back into the air. Some HVAC technicians recommend running the system for 30 minutes with a fresh filter before Phase 2 to capture any airborne particles pulled through the system during Phase 1 cleaning.
Phase 2: Dry vacuuming, ceiling to floor. Working room by room, top to bottom: ceiling light fixtures and fan blades first, then wall surfaces (dusty film on painted walls near sanding areas), then baseboards, then window sills and horizontal surfaces, then floors last. Never mop before vacuuming. Wet mopping over construction dust creates a muddy alkaline paste that is harder to remove than the dry dust and damages grout and wood finishes.
Phase 3: Damp wipe of all surfaces. After vacuuming, all horizontal surfaces get a damp wipe with a microfiber cloth. Microfiber holds particles electrostatically rather than spreading them. Cotton rags spread fine particles. Change cloths every 4 – 5 minutes — a cloth saturated with drywall dust stops capturing and starts depositing.
Phase 4: Wet mopping. Hard floors only after all surface work is done. Use a flat mop with a fresh pad per room. Drywall dust turns alkaline in water — use a pH-neutral floor cleaner to avoid etching marble or limestone tile, which can happen with alkaline solutions at elevated concentrations.
Phase 5: Repeat vacuum. A final pass with the industrial vacuum after mopping captures any particles that settled during the mopping process. This step surprises most clients — the floor looks clean after mopping. The vacuum still fills with fine material.
What to check before calling the job done
A basic ATP bioluminescence test won't tell you much about drywall dust — it tests for biological contamination, not mineral particulates. The visual check that actually matters: wipe a white microfiber cloth across any horizontal surface in the renovated area. If you see a gray or white smear, the surface isn't clean. Cabinet tops, the top edge of door frames, the inside of window tracks, and the tops of baseboards are the surfaces most likely to fail this test even after cleaning.
Window tracks deserve specific attention — construction dust packs into the track channels and isn't removed by vacuuming. Use a stiff detail brush to break up compacted dust in track channels before vacuuming. A cotton swab for the corners.
How long post-construction cleanup takes
For an average Atlanta home renovation affecting 2 – 3 rooms (kitchen remodel, bathroom remodel, or basement finish), post-construction cleanup takes 6 – 8 hours with a two-person professional crew. Full-home renovations or gut remodels run 12 – 16 hours across multiple crew members. This is significantly more labor than a standard deep clean because every surface requires the five-phase sequence above, and the equipment setup and changeover time is substantial.
PurFresh Clean handles post-construction cleanup for Atlanta homeowners and contractors. We bring industrial HEPA vacuums and follow the full five-phase sequence. If you're scheduling a renovation, it's worth building the post-construction clean into the project timeline. Contact us for a quote.